I'll keep this little blog running for my dog bickies and sharing of non art related goodness..
But for my art blog, you can check me out here

Saturday, January 31, 2015


Wednesday, January 28, 2015
Soul Mates - a Work in Progress
It may seem a little weird
(but that's ok, cause I'm a little
coo coo ka choo sometimes)
... but I like to share
the process of my paintings from
start to finish.
And also my inspiration
for why I painted a certain
painting.
So here's the story, I was running
along one morning, kind of meditating on a
commission piece, I had been asked
to paint.
My friend wanted red birds
in the painting and she didn't mind
where they were or what they
were doing, she just wanted
red birds.
AND BAM, This happened ---->

so now I had my inspiration,
I was off on a mission.

Beginnings of the background

More colour to the background

A close up of the finished birdies

and the finished product
"SOUL MATES"
24 x 36 inches
and there you go, sometimes
inspiration happens in the weirdest of places.

Tuesday, January 20, 2015
Love Tree
Just a quick post to share my latest
painting and a few before photographs.
In an effort to always keep thinking
outside of the box but to keep my
own artistic voice loud and clear,
I tried a new technique for this background
which I just LOVED.

First Layer above

adding the tree

and the finished product
LOVE TREE
10 x 12 inches
and perfect for that
special somebody for
Valentines Day
as always thank you for popping by
xx
Sunday, January 18, 2015
Serena - a DO OVER or RE-WORK
7 months ago, I painted the first version of "Serena"

at the time I loved her so much
and was lucky enough for a lovely
lady who owns a clothing boutique
to reach out to me to ask it would be
ok to hang her in the shop.
7 months on and it was time
to bring Serena home. After
not having seen her for that long
and my tastes having changed so
much in that time, I felt like
Serena needed a do-over.
So here's a few progress photo's of
the re-work in action.

So above is the 'cover up' period ;-)
the beauty of acrylic paint is
that if you don't like something
you can paint over it. I have ZERO
experience with oils, so cannot
comment on whether or not it is easy to
paint over a piece you don't like.

Extended her hair
fixed her face
added a head band
changed the background
and most importantly
added a MONO BROW!
and phew I felt like
it was a huge difference
already

A little more work

and the transformation is complete!
I love the Take-Two Version
I love the Take-Two Version
of
Serena
now!!
As always thanks for popping by
xx
Saturday, January 17, 2015
Introducing Rosie ----->>
I thought it only appropriate, that I share a photo of my beautiful Rosie for anyone that has not met her in real life.

She is a 7 1/2 year old King Charles Cavalier. She snores very loudly (and I mean rattle the tiles on the roof loud), has big floppy ears, loves the beach, adores my children, but most importantly ---> she loves whatever I cook for her!
Currently I am looking at a natural flea spray (still trialling it), and ways to combat her bothersome bad breath (without me having to brush her teeth twice a day).
So watch this space :-)
Friday, January 16, 2015
Rosie's Seriously Scrummy Dog Treats
by far my Rosie's
favourite recipe yet!

Rosie's Seriously Scrummy
Dog Treats
160g Rolled Oats
50 g Olive Oil
1 1/4 Cups of Boiling Water
1 Tablespoon of Vegetable Stock (**See note below**)
185g Peanut Butter
1 Egg
300g of whole wheat flour (I used Atta Brand)
** I made my own vegetable stock in the Thermomix using the recipe from the Everyday Cookbook - page 23
Instructions:
- Preheat oven to 150 degrees.
- In a large bowl, combine rolled oats, oil, vegetable stock, and boiling water. Let stand 10 minutes. I used the Thermomix to weigh and measure all of the ingredients and let it sit in the bowl.
- Next thoroughly stir in peanut butter, whole wheat flour and egg. If using the Thermomix, blitz together on speed 7 for about 10 seconds.
- Knead with your hands until you have a smooth ball of dough. I used my Thermomix to do this process which was quicker and kneaded for 2 minutes.
- Take a rolling pin and flatten out the dough to about 1/2 inch thickness. Use a biscuit/cookie cutter to cut out fun shapes. If you're feeling lazy, you can just leave the dough as is and bake it like one whole biscuit. You can always break it up after it's cooked. If you want a shinier looking biscuit, you can also brush on a thin coat of egg whites before baking.
- Place your dough onto a tray with a non-stick baking sheet and bake for 15-20 minutes (depending on your oven) or until golden.
Let your biscuits cool completely. Store in an air tight container for up to a week (if your furry friend let's them last that long!). Remember these are fresh ingredients with no preservatives, so they will not store as long in a container as a commercially bought brand of biscuits would.
Thursday, January 15, 2015
Alice & The Fawn

My latest painting
"Alice & The Fawn"
20 x 24 inches

Commissioned piece
for a very special
little girl named Alice

As always
thank you for
stopping by
xx
Wednesday, January 14, 2015
Follow No One...
With all of the information out
there on Social Media and
just readily available
via a quick Google search,
it is really really hard
to find your own voice
and not want to follow
everyone else. Especially if they
are successful in their own field.
BUT no matter the temptation
there is only one YOU!
So follow your own voice.
xx

Photo taken by me (via Iphone)
Quote created on Canva
Friday, January 09, 2015
Deer Frida - From Start to Finish
I like to share the journey of a
painting on my blog for two reasons
1) As a record for me personally to
go hey, it started looking like a hot mess
and evolved into either a bigger
hot mess, or something I can
be proud of.
and
2) To maybe serve as inspiration
to other artists out there that
maybe get a little thrown off
by the way a painting first
starts off. My tip is to
just keep going, until your
gut says it's happy!

First layer of papers

Frida and the baby deer
sketched in.

a little more sketching and development

A close up of the texture

and the deer

Side view

and the end product
Deer Frida
20 x 24 inches
As always
thank you for
popping by
xx
Thursday, January 08, 2015
Carrot, Banana & Apple Dog Biscuits ----->>> shhhhh dogs with hips look away
Round two...
Rosie approves...
But then again
She is a guts on legs
But shhhhh
don't tell her these
are low fat and
better yet
good for her!!

Carrot, Banana & Apple Dog Biscuits
1/4 cup of natural applesauce (**see note below**)
1 cup of shredded carrots (**see note below**)
1 medium rip banana
1/8 cup of water
1 1/2 cups of whole wheat flour
1 cup of rolled oats (** see note below**)
** I made my own applesauce in the Thermomix using the recipe from the Everyday Cookbook - page 42
** I grated my own carrot in the Thermomix on speed 8 for about 10 seconds
** I blitzed the oats in the Thermomix on speed 8 for about 10 seconds
Instructions:
- Preheat oven to 150 degrees.
- Mash the rip banana in a small bowl.
- Grate the carrots and mix with the banana.
- Pour in applesauce and water.
- In a medium bowl, whisk together the flour and oats. I used the Thermomix and blitzed together on speed 6 for about 15 seconds.
- Knead with your hands until you have a smooth ball of dough. I used my Thermomix to do this process which was quicker and kneaded for 2 minutes. ***note*** this recipe is very sticky!
- Take a rolling pin and flatten out the dough to about 1/2 inch thickness. Use a biscuit/cookie cutter to cut out fun shapes. If you're feeling lazy, you can just leave the dough as is and bake it like one whole biscuit. You can always break it up after it's cooked. At this point I also sprinkled on a little extra cinnamon on the top of the biscuits, but that is just an option. If you want a shinier looking biscuit, you can also brush on a thin coat of egg whites before baking.
- Place your dough onto a tray with a non-stick baking sheet on top because as mentioned above this recipe is very very sticky!
- Bake for 15-20 minutes (depending on your oven) or until golden.
Let your biscuits cool completely. Store in an air tight container for up to a week (if your furry friend let's them last that long!). Remember these are fresh ingredients with no preservatives, so they will not store as long in a container as a commercially bought brand of biscuits would.
Wednesday, January 07, 2015

Sunday, January 04, 2015
Oprah

How beautiful is this photo
taken in Broome Western Australia.
My friends daughter took it
and I didn't apply any filters!
WOW right.
And thank you Oprah Winfrey
for your inspiring quotes.
What a woman!
Saturday, January 03, 2015
Frida Kahlo - I Paint Self Portraits
Frida Kahlo
I am obssessed!

Quote by Frida Kahlo
Art by Natalie Briney
As always
thank you
for popping by
xx
Thursday, January 01, 2015
Always Remember
The sheer beauty of seeing this family of swans
moving along as one unit,
stopped me in my tracks this morning
while running along the beach.
I just had to stop and
take a picture.
The quote just sums it up
beautifully.

FOCUS
FOCUS
Follow
One
Course
Until
Success
because I'm very much a
"wow look at that shiney object"
kind of gal
and find it hard to stay on track.
This will be my 2015 mantra

Wednesday, December 31, 2014

Tuesday, December 30, 2014
Innocence - From Start to Finish & A Quote
My latest art, from start to finish.
Titled "Innocence"
36 x 48 inches
Very loosely based on Klimt's famous painting
Mother & Child

background on and
sketch drawn in.

mum and bub have some
skin colour added

background added too and
hair colour added

and here we are
finished product.
as always
thank you
for popping by
xx

couldn't resist adding this quote over the top xx
Friday, December 26, 2014
Apple Cinnamon Dog Biscuits
I have been experimenting with making my own dog food for a little while now and recently a friend introduced me to a recipe for homemade dog biscuits.
With that very first batch, I knew I was on to a winner. Our dog's coat has never been shinier, her tail hasn't stopped wagging, she has never once turned her nose up at anything I've made and just listening to her crunching away, assures me they are delicious.
So all of this positive feedback has inspired me to find more recipe's and adapt them to my lifestyle. I also wanted to experiment with different flavours/textures and flours all while knowing that what I was putting into the bickies, was not only safe for my dog, but I had control of it. Ie no preservatives etc.
So want to make your own batch of bickies for that special furry friend in your life?
Well you can.... here is my latest recipe - Apple Cinnamon Dog Biscuits

Apple Cinnamon Biscuits
1 cup of natural applesauce (**see note below**)
1 teaspoon cinnamon
1 tablespoon parsley
1 cup cold water
1/2 cup coconut oil (or olive oil)
5 cups brown rice flour (**see note below**)
1/2 cup powdered milk
2 large organic eggs
** I made my own applesauce in the Thermomix using the recipe from the Everyday Cookbook - page 42
** I made my own rice flour using brown rice and using the Thermomix recipe from the Everyday Cookbook - page 21
Instructions:
- Preheat oven to 150 degrees.
- In a large bowl, whisk together all the dry ingredients.
- In a smaller bowl, beat the eggs lightly. Add the rest of the wet ingredients.
- Gently combine the dry ingredients with the wet ingredients.
- Knead with your hands until you have a smooth ball of dough. I used my Thermomix to do this process which was quicker. ***note*** this recipe is very sticky!
- Take a rolling pin and flatten out the dough to about 1/2 inch thickness. Use a biscuit/cookie cutter to cut out fun shapes. If you're feeling lazy, you can just leave the dough as is and bake it like one whole biscuit. You can always break it up after it's cooked. At this point I also sprinkled on a little extra cinnamon on the top of the biscuits, but that is just an option. If you want a shinier looking biscuit, you can also brush on a thin coat of egg whites before baking.
- Place your dough onto a tray with a non-stick baking sheet on top because as mentioned above this recipe is very very sticky!
- Bake for 15-20 minutes (depending on your oven) or until golden.
Let your biscuits cool completely. Store in an air tight container for up to a week (if your furry friend let's them last that long!). Remember these are fresh ingredients with no preservatives, so they will not store as long in a container as a commercially bought brand of biscuits would.
Wednesday, December 24, 2014
From Start To Finish - Solveig's Song

From the nervous stages
of the blank canvas


to the next layer of adding
papers

close up of some of the texture

on to adding the tree

Then the finished product
"Solveig's Song"
24 x 36 inches
24 x 36 inches

and I couldn't resist adding
part of the actual song
As always
thank you for popping by
Tuesday, December 23, 2014
2014 - what a fabulous year!
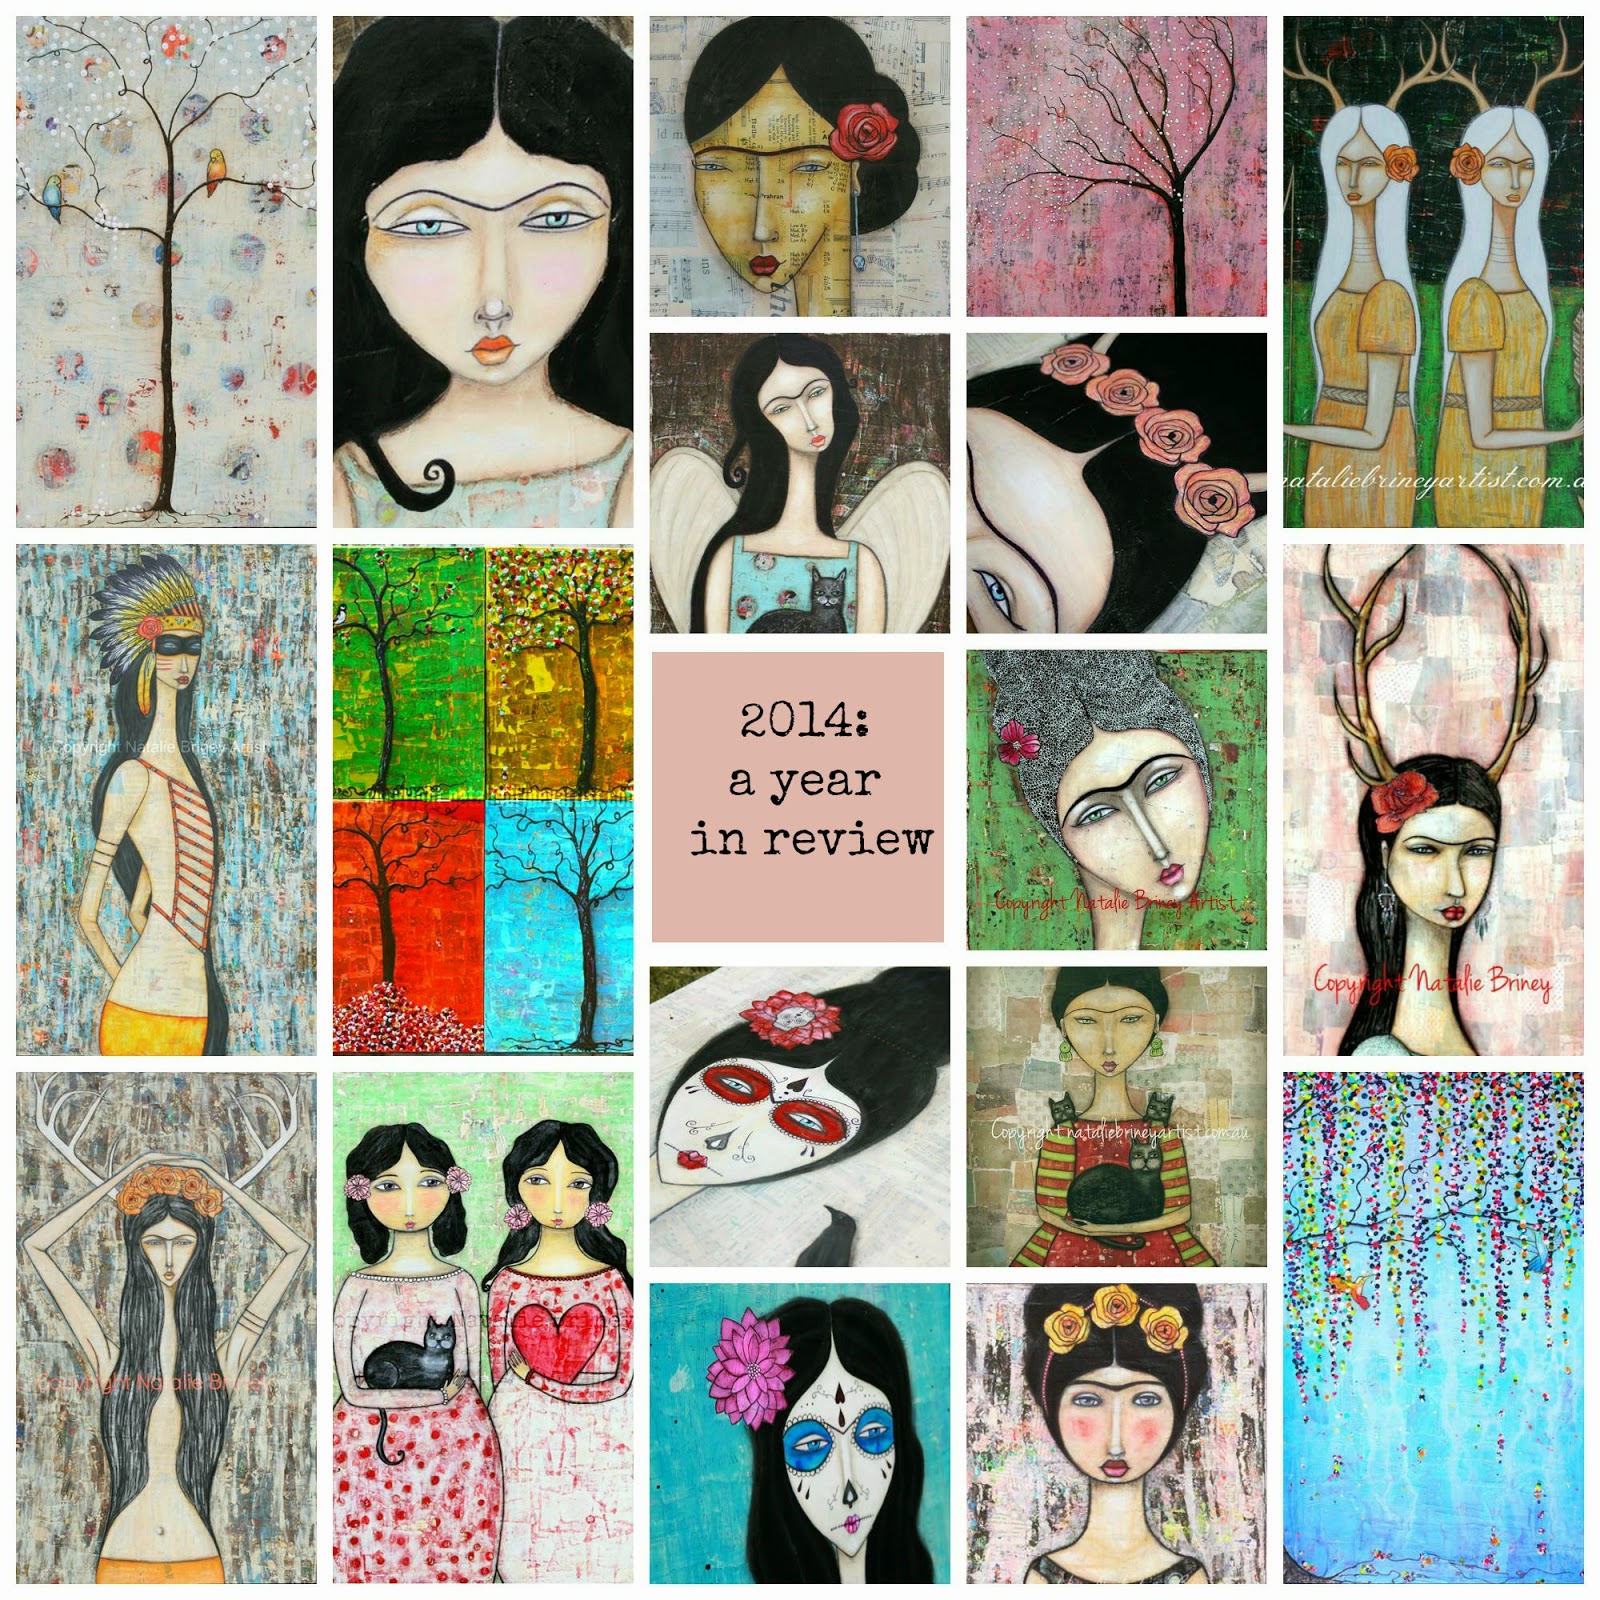
Since 2013, I wanted to start a yearly tradition for myself.
One where I collate all of my paintings
together into a single photo.
The reasons for this are not only to
share them with my friends/family/supporters of my
art (who I would also put into the category of friend)
art (who I would also put into the category of friend)
but also for me personally to see:-
1) how I've been travelling
throughout the year artistically
2) make sure my work isn't all
looking the same
3) which colours/paintings are working for me and
that I did like and those that I wasn't so keen on.
that I did like and those that I wasn't so keen on.
All of these steps help me to move forward into the
new year having a clearer picture in my head.
here's last years review pic (2013)

As always thanks
for taking the time to
pop by xx
Subscribe to:
Posts (Atom)